Showing posts with label Gardening. Show all posts

Sunday, September 28, 2014

My garden is turning red, orange and green!

For the last 2-3 years, I have planted red, orange and green peppers in our garden. I like to chop up the peppers, freeze them and add them to stew, chili, gumbo etc. I wanted the variety of colors. Every year all my peppers are green! I thought maybe I picked up the wrong plant or someone exchanged the plant tag. The plants produced plenty of peppers, none were red or orange. This year was no different, I discussed this with a friend and she had the same problem. So I researched it and found out that green peppers are actually unripe and if you are patient your peppers will turn colors. This is why they are more expensive in the grocery story, it takes a lot longer for them to ripen. I feel a little silly, but, am happy to know I can grow red and orange peppers. 
I will post this to these blog parties:

Wednesday, August 27, 2014

Crock-Pot Hot Sauce

With the abundance of  cherry and Roma tomatoes in our garden this year I wanted to make hot sauce. My sister gave me the idea to make it in my crock pot.  It uses the tomatoes, cooks while I do other things and keeps me from standing over a hot stove. Which is a win, win situation.
Fresh ingredients are the best and nothing beats tomatoes straight from the garden.
I have one cherry tomato plant and one roma tomato plant and I am able to make this once or 
twice a week. 

We also grow jalapenos and bell peppers.
 I cut the stem end off and cut the tomatoes in half, using a scale I measure 3 pounds of tomatoes. I would guess it would be 3 1/2 pounds before you cut off the stems. Be sure to wash your tomatoes first. 
Put tomatoes in crock pot.
Add:
 one medium onion cut into big chunks
3 jalapenos (not seeded) cut into fourths (this is not an exact science, I have found the bigger the
 jalapeno the hotter)
 Always wear gloves when handling jalapenos!
2 medium bell peppers cut into big chunks
4 tsp salt
1 tsp sugar
2 Tblsps chopped garlic (I do buy jars of garlic already chopped)
Cook 3 hours on high
Turn off the crockpot, take the lid off and let it cool.
Using a colander drain your tomato mixture. Reserve the liquid, it could be used for stew, gumbo etc.
Using either a blender or food processor puree the mixture. If you are using a blender you may 
need to do it in batches.
This recipe makes appox. one quart and it freezes well.
I will be posting this recipe to these blog parties:

Wednesday, June 5, 2013

Homemade Weed Killer

Tired of buying expensive weed killer? Try this homemade solution, it really does work! 
The photos below were taken a day apart. 
Homemade Weed Killer
Spray bottle
20 ounces Apple Cider Vinegar
2 Tablespoons Salt
dash Dawn Soap


Sunday, June 19, 2011

Peonies

Peonies are one of my favorite flowers that grow in my yard.  They require very little maintenance and give you large blooms with an aromatic rose scent. Peonies also, make a wonderful cut flower. My only complaint,  they don't last long enough. They bloom for only a couple of weeks each spring but they do leave behind lush green foliage.

I will be sharing my Pink post to Pink Saturday at How Sweet the Sound:


Thursday, April 14, 2011

Balloon Terrarium

This is such a fun project! It can be done any time of year and can be a little messy but that is one of the things that makes it fun!  You can use this project to help teach about seed germination and gardening. Every child loves to see something grow!
Do try not get as much of the soil on the sides as I did.
What you Need:
Large Clear Latex Balloons (I found them at a party store)
Seeds of any kind, I used radish
Funnel with a large opening on the bottom and top
Balloon Pump
1/2 cup measuring cup
Potting Soil
Water 
 First blow up the  balloon, let the air out. 
It will expand the balloon and makes it easier to get the soil in.
Put funnel in neck of balloon, carefully put in 1/2 cup potting soil. Add a little at a time and use your fingers to poke it down the neck of the balloon. Slowly pour in 1/4 to1/3 cup water. The water needs to be absorbed by the soil, so go slow. Before taking out the funnel put in 4-8 seeds. Take out funnel. Using the balloon pump, carefully blow up your balloon. Tie a knot in the end, using ribbon hang your balloon up in a sunny window. It should take the seeds 5-7 days to sprout. The balloon can be popped and you can plant the seedlings. Or just see how long the plant will live. The plants in the balloon will die because you are unable to add more water and there is not enough soil. 
I will be sharing this to these blog parties: Gold Star Wednesday, 

Saturday, August 14, 2010

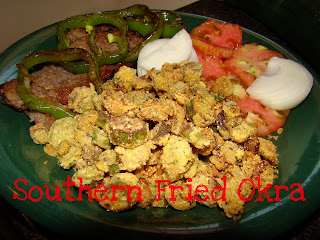
OKRA: History and Southern Fried

Okra has the most beautiful bloom in our garden!
 It is related to cotton, hollyhock and hibiscus.  It loves drought,  sun and heat so, of course, it does great here in Oklahoma.  It is even part of Oklahoma's official state meal!!

Okra originated in Africa and was brought to America by African slaves. Thomas Jefferson listed it  being grown at his home in Virginia in 1781. 


Okra has vitamin C and A, B complex, iron and calcium. The seeds can be toasted and ground and used as a coffee substitute and an edible oil can be made from ripen seeds.
  The downside to okra is that the leaves and pods are covered with tiny spines that make you itch while picking it. The best thing to do is wear long sleeves and gloves. My theory growing up is that I wouldn't eat okra so therefore I should have to pick it. My parents did not agree with my theory and I still had to pick it. Now I pick it every 2-3 days for several months during the summer. Pods should be picked when they are 3-5 inches long. If it gets to big it becomes tough and stringy.
There are so many ways to prepare okra, once you start listing the ways you sound like you should be in the movie Forrest Gump. Pickled, boiled, cut up and put in soups or gumbo, but my favorite is fried.
I don't have an exact recipe for frying okra. It depends how many people  and how hungry we are to how much I prepare.  It is always a guess and one that usually turns out okay. Cut your okra in 1/4 to 1/2 inch slices, salt and pepper.  Add chopped onion.  Add a beaten egg, a little milk and mix.
 I add 2 to 1 of flour and cornmeal, more flour than cornmeal.
A cast iron skillet is the best way to fry okra. Pour a generous about of oil in your skillet and let it get hot but, not smoking. Slowly add your okra, salt and pepper again. Turning it  when it becomes brown and crisp, try not to flip it too often.

Let it drain on paper towels. It is the perfect side dish for so many meals.
I will be posting this to these blog parties:
Made by You Monday
Recipe Sharing Monday
Creative Blogger's Party & Hop
Foodie Friday
Frugal Friday
Full Plate Thursday


Wednesday, May 5, 2010

Clay Pot Bird Bath

I wanted to add a bird bath to my front flower bed. I also wanted it to be unique, colorful and
one of a kind. This is simple and could be done by all ages. I will be posting this to Thrifty Thursday
Posted by Picasa
I used paint for the outdoors, it can be bought at Hobby Lobby and Wal Mart. Buy or reuse three clay pots, if you are using used ones, wash and let dry. The bird bath can be as tall or short as you want. Make sure that the pots stack on top of each other.  You also need a clay pot tray for the top. Paint as desire, let your imagination be your guide. Paint each pot separately. It will take a couple of coats of paint to cover your pots, let dry between coats.

.
I measured where my top pot should be glued and used gorilla glue.

I weighted it down and let it dry for several hours. Taking the pots outside  I sprayed each section twice with Krylon indoor/outdoor clear statin spray.

Posted by Picasa

Sunday, March 28, 2010

Planting Potatoes

For us in Oklahoma it is time to plant cool season plants, one of which is potatoes. You can purchase seed potatoes by the pound at local agricultural stores, nurseries and home improvement centers. Potatoes you buy from the grocery store can not be used, they have been treated not to sprout. Seed potatoes are treated to be disease free. They can be planted in the ground or in containers.

You want to plant your potatoes in loose, well drained soil in a sunny  location. Plant when the ground is not wet. Cut your potatoes so you have 2-3 eyes on each piece, after you cut them let them callus over for a day. This will help to keep them from rotting in the ground. Plant 5-6 inches deep, as potatoes start to grow they need to be hilled. Use a hoe to bring soil around plants, this is gives the potatoes plenty of room to grow and be productive. It is a necessary and constant chore but worth it. 
The past few years we have planted potatoes in our garden but this year I decided to use an old tub. My yield won't be many but our garden spot is small and I wanted other vegetables. 

A few years ago my son planted red, white and blue  potatoes in the same tub along with 5 gallon buckets.  If you don't have much space this a great way to grow some of your own produce. Place 5-6 inches of soil in bottom of bucket, trash can or any tall container. Make sure there are drain holes in the bottom of anything you use. Put pieces of potatoes 5-6 inches apart on top of soil and add 3-4 inches of soil, make sure potatoes are covered well. Water. As potatoes start to grow, continually add soil until you reach the top of your container. After the tops of your plants die off it is time to harvest, it will take 2-4 months.  It was a great learning experience for my son.
Posted by Picasa

Saturday, March 20, 2010

Spring

Welcome Spring
Spring officially begins today! In northern Oklahoma our daffodils our blooming and the temperature has been in the seventies. The funny thing is that they are predicting 5-8 inches of snow for today. Hopefully the ground will be warm enough for the snow not to stick.

Daffodils are very easy to grow and come in a variety of colors, sizes and shapes. The bulbs can be planted in shade or sun. In Oklahoma we don't have to dig up the bulbs after they bloom. We wait until the foliage starts to turn yellow and mow them down. The great thing about daffodils is that they multiply and can be divided.Posted by Picasa

Daffodils make a colorful and springy arrangement but, they are not long lasting.

Thursday, February 11, 2010

Spring Time

Hopefully this is a sign that spring is coming.

I didn't plant these crocus but they come up every year.


This is the beginning of one of my hyacinth bulbs.

I love to plant bulbs they are low maintenance, come back year after year
and some mulitiply.

Posted by Picasa